
Why Windows 11 Pro Is the Right Choice for Professionals
Downloading Windows 11 Pro is a smart step for anyone who wants more control and security in their system. It brings advanced features that help users work better. It gives access to strong encryption, remote desktop, and group policy management. These are not available in the Home edition. Professionals and business users prefer this version because it boosts productivity. It also helps in managing company data safely. Many users download it for its performance benefits. These include faster boot times and better memory management. The sleek design is another reason to consider it. It fits well into any modern workflow. Whether you work from home or in a company, this version supports it all. That’s why many are downloading Windows 11 Pro today.
Check If Your PC Meets Windows 11 Pro System Requirements
Before downloading Windows 11 Pro, check if your system supports it. Your device must meet the minimum hardware needs. These include a 1GHz or faster processor with 2 or more cores. It must be on a compatible 64-bit processor. You need at least 4 GB RAM and 64 GB storage. TPM version 2.0 and Secure Boot must be enabled. The graphics card should be DirectX 12 compatible. Also, you need a 720p display that is more than 9 inches across. Windows 11 Pro will not run well if these needs are not met. Check these items first. This helps you avoid problems later. Many users forget this step when downloading Windows 11 Pro.
Backup and Prepare Your PC Before You Begin
Backing up your data is very important before downloading Windows 11 Pro. Save your important files to an external drive or cloud storage. This keeps your data safe if something goes wrong. Make sure your current system is updated. Turn off any firewall or antivirus during installation. It helps avoid errors. Free up enough disk space before you start. Remove unused files and programs. This makes the process faster. Also, note your current product key in case you need it later. When downloading Windows 11 Pro, these steps are easy but vital. Skipping them can cause delays or data loss. Take time to do them properly.
Where to Download Windows 11 Pro Safely and Legally
Downloading Windows 11 Pro from a trusted source is key. Always use Microsoft’s official website. Avoid third-party sites that may have fake or infected files. Using official sources ensures you get a clean copy. It also keeps your system safe. To begin, go to Microsoft’s download page. Choose the correct version. Follow the steps to get the ISO file. You can also use the Media Creation Tool. Do not use torrents or cracked versions. These can harm your PC. Many people face issues due to unsafe downloads. Be wise and only choose trusted links. When downloading Windows 11 Pro, this step ensures safety and quality.
How to Verify the Authenticity of Your Windows 11 Pro Copy
It is easy to check if your download is genuine. After downloading Windows 11 Pro, use checksums to confirm file integrity. Microsoft provides the hash value for each ISO file. Use a tool like QuickHash or Windows PowerShell. Match the hash of your file with Microsoft’s. If they match, your file is clean. If not, do not install it. Also, check the digital signature. Right-click on the file and go to properties. Look under the digital signatures tab. Make sure it’s signed by Microsoft. These steps protect your PC. They are very important when downloading Windows 11 Pro.
Step-by-Step Guide to Downloading Windows 11 Pro
If you’re planning to upgrade or install Windows 11 Pro on your PC, downloading the official ISO file is the first step. This short guide will help you securely get the Windows 11 Pro ISO from Microsoft and create a bootable USB for installation. It’s simple, safe, and ideal for a fresh setup or upgrade.
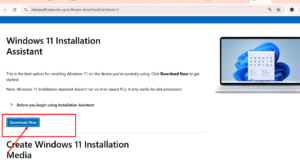
Step 1: Download via Microsoft Official Website (Using Installation Assistant)
Download Windows quickly and securely using Microsoft’s official Installation Assistant. This reliable tool guides you through a smooth upgrade to Windows 11 with just a few clicks. Download directly from the official site to ensure a safe and hassle-free installation.
- Go to Microsoft’s official download page:
https://www.microsoft.com/software-download/windows11 - Click “Download Now” under Windows 11 Installation Assistant.
- Run the tool and follow the on-screen instructions.
- Your PC will be checked for compatibility and upgraded to Windows 11 Pro.
Note: If this method doesn’t work due to compatibility issues, try Step 2 below.
Step 2: Download ISO File and Install via Bootable USB
Securely download the ISO file of your desired operating system from the official website. Then, use popular tools like Rufus or BalenaEtcher to create a bootable USB drive by writing the ISO file to it. Insert the USB into your computer, access the BIOS or UEFI settings to select boot from USB, and easily start the operating system installation. This method ensures a fast and reliable setup for your new system.
- On the same page, scroll to the “Download Windows 11 Disk Image (ISO)” section.
- Select Windows 11 (multi-edition ISO) > choose language > click 64-bit Download.
- Use Rufus or another tool to create a bootable USB from the ISO file.
- Boot your PC using the USB and follow the setup instructions to install Windows 11 Pro.
- After installation, enter your product key to activate the system.
- Click the download link
- Open the file and follow setup steps In a few minutes, your Office will be ready. This process ensures legal and safe.
Make sure you have a valid Windows 11 Pro license key for activation during or after installation.
Important Notes
Always download ISO files directly from Microsoft to avoid compromised software or activation issues.
- Use 64-bit architecture for optimal performance and future compatibility.
- Keep the ISO file unmodified for best results during installation.
- Ensure your PC meets the minimum system requirements for Windows 11 Pro, including TPM 2.0 and Secure Boot.
Where to Get Windows 11 Pro Legally
You must download from trusted sources. That’s the only way to get clean Windows 11 Pro Downloads. Here are your best options:
- Microsoft’s official website
- Trusted partners like MSKeyDeals These websites provide real license keys. You pay once and get full access. Always look for HTTPS in the web address. That means the site is secure. Also, check customer reviews. This helps you choose the right seller. Buying from unknown sites may save money at first. But it can cost you later. Stick with legal sites for your Windows 11 Pro Downloads.
Create a Bootable USB Drive for Installation
After downloading Windows 11 Pro, you need to create a bootable USB. Insert a USB drive with at least 8GB space. Download and open the Media Creation Tool. Choose the option to create installation media. Select your language and edition. Pick the USB flash drive option. Select your USB from the list. The tool will format and load the ISO file. Once done, your USB is ready to install. Always safely remove the USB. It avoids corruption. This step is important. When downloading Windows 11 Pro, a bootable USB makes installation simple.
BIOS and UEFI Settings You Need to Adjust Before Installing
Before installing, go to your BIOS or UEFI settings. Restart your PC and press the right key (usually F2, F10, Del, or Esc). Find the boot menu. Set your USB drive as the first boot device. Enable Secure Boot and TPM 2.0 if not already active. Save the settings and exit. Your PC will restart. These steps are required before installing Windows. Skipping them can lead to install errors. When downloading Windows 11 Pro, remember to check these BIOS settings. They ensure your system is ready.
Step-by-Step Installation Guide for Windows 11 Pro
Plug in your bootable USB and restart your PC. It should boot from the USB. Select your language and region. Click “Install Now.” Enter your product key or skip to do it later. Choose Windows 11 Pro edition. Accept the license terms. Choose “Custom” installation. Select the drive where you want to install. Click next. Windows will now install. This takes time. Your PC will restart several times. After install, set up your account and preferences. Connect to Wi-Fi and sign in to your Microsoft account. When downloading Windows 11 Pro, this install guide helps you complete the process smoothly.
Activate Windows 11 Pro with a Genuine License Key
Activation unlocks all features. After downloading Windows 11 Pro, go to Settings > System > Activation. Click on “Change product key.” Enter your 25-digit license key. Click next and activate. If your key is valid, Windows will activate online. You can also call Microsoft if online activation fails. Always use a genuine key. It ensures you get updates and full support. Never use cracked keys. They can cause your system to get blocked. When downloading Windows 11 Pro, activation is the final step to enjoy all features.
What to Do After Installation: First Steps for Security and Performance
After installing and activating, do some quick setups. Update your system fully. Go to Settings > Windows Update. Install all pending updates. Then, install drivers for your hardware. Use your PC’s manufacturer tools for this. Set up antivirus protection. Microsoft Defender is a good built-in option. You can also use third-party tools. Tweak settings for better performance. Turn off unwanted startup apps. Enable features like BitLocker for added safety. When downloading Windows 11 Pro, post-install steps help get the best performance and protection.
Troubleshooting Tips for Download and Installation Problems
You may face issues while downloading Windows 11 Pro. If the download is slow, check your internet. Restart your router or use a wired connection. If the ISO file is corrupt, delete and re-download it. If the USB tool fails, format the USB again and retry. During installation, if you get errors, check BIOS settings. Enable TPM and Secure Boot. If Windows fails to install, reset the BIOS to default. You can also try another USB. Contact Microsoft Support for help if needed. When downloading Windows 11 Pro, these tips save time and reduce stress.
conclusion
Windows 11 pro Downloads are easy when you do them right. Start with legal sources. Follow the right steps. Check your files. Then install and activate safely. Keep everything updated. Stay compliant with license terms. Avoid risks by using official websites only. This way, your Office suite stays safe, fast, and legal. Whether you use it at home or work, you can trust it. Now you’re ready to start your journey with confidence.
Thanks for Reading.